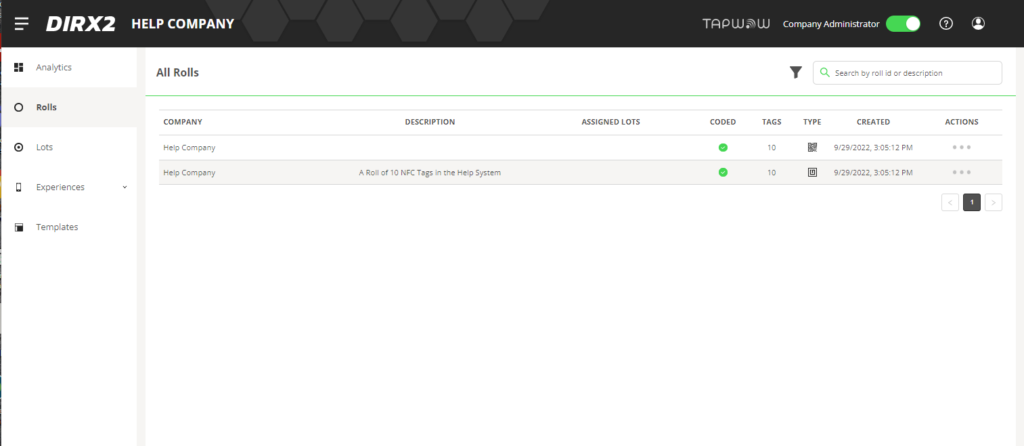
Rolls can be managed through the Rolls Panel that can be accessed by selecting Rolls from the Navbar.
Rolls in the system will be shown in a list view and the user can select an individual roll to edit or evaluate.

List Headers
Company
This identifies the Company that a particular Roll ID is assigned to. In almost all cases it will be the company that you are working in currently.
Roll Description
Add your own description of the roll so that it can be easily identified. Roll Description is edited on the Roll Detail screen which can be accessed from the Edit function under Actions.
Assigned Lots
Defines which lots this Roll has been assigned to.
Coded
There are two types of rolls that are possible within the system:
Rolls with Encoded Tags – Marked with a green circle with a check in this column. These tags have been coded to redirect in the system and can be used with all system functions.
Rolls with Non-Encoded Tags – Marked with a red circle with a minus sign in this column. These tags have not been encoded to use the features of the system. The tags could be in a pre-production phase or are intended to be used for other purposes and simply appear in the system as a catalog.
When using functions in the system like Experiences, Analytics, Anti-Counterfeit and Product Diversion, users should ALWAYS be assigning Encoded tags with the green icon.
Tags
The number of individual tags that are included on a particular Roll.
Tag Type
This identifies the types of Tags on a particular Roll. All Tags on a Roll must be the same type. Possible Tag types include QR codes and various NFC Tag types (210u, 213U, etc.). The type of tags listed does not affect how the system works, it is more to identify rolls and contents for identification.
Created
Date on which the roll was created.
Actions
Mousing over the three dots shows the actions that you can execute for a lot.
Edit – Edit is the most common and can be achieved by selecting Edit from the drop down list.
Export – Export is a tool used for internal purposes to manage and work with tags and brings up the following menu:

Export Tags – Selecting this click box will create a downloadable list of all of the tags in this role. If the roll includes NFC Tags, then the list will include a list of the Tag ID and the Manufacturer’s ID for every tag on the roll. If the roll includes QR Codes, it will simply be the list of Tag IDs since there is no Manufacturer ID.
Export QR Codes # – Selecting this click box will create a downloadable collection of the QR codes associated with each tag as an PNG file. The number at the end of Export QR Codes represents the number of tags on the roll. These image files can be used to initiate system interactions. With the dropdown the user can select Simple QR Codes which would have no branding on the qr code, or Platform Branded QR Codes which feature the platform logo in the center.
Once the user has selected the necessary option, click Generate and Export in the green box at the bottom. Within a few seconds a file will be downloaded to the download file on the user’s computer. Within that file that is downloaded is a .CSV file that has the list of Tag IDS and Manufacturer IDs in two columns, a folder that says QR which has all of the QR code images and a JSON file that has the pertinent details for the roll that was downloaded.
IMPORTANT – GENERATING AND DOWNLOADING QR CODE IMAGES IN THIS MANNER IS COMPUTER RESOURCE INTENSIVE AND CAN ONLY BE DONE IN THIS MANNER FOR ROLLS OF 100 OR LESS TAGS. To generate the QR Codes for larger rolls, please contact your system administrator.
Assigning a Roll to a Company
Assigning a Roll to a Company can only be done by a Company Administrator.
